i have said it before.
but i ll say it again.
there is something very comforting in taking your time to cook. nothing too fancy, but nothing too frenzied either. and definitely something that evokes taste memories of your childhood.
so, take out your mother s mortar. you know, the Japanese one with the special grooves.
toast your sesame seeds (careful, don t let them burn), pour them into the mortar and start grinding.
slowly.
let your hands do the work, while you savor the scent and think of nothing else.
calm down.
then add the other essentials, soy sauce, sugar and a tiny dash of mirin.
there you go. perfect. you don t need anything else now.
except for your vegetables. here are some French green beans.
oh, i could add this as a dressing for some carrots too, yes? or some lightly cooked spinach? gently grilled aubergine perhaps?
SESAME SOY DRESSING:
from 'Everyday Harumi' by Harumi Kurihara
INGREDIENTS:
50 gr white sesame seeds
1 or 2 tablespoons of fine white caster sugar
1/2 tablespoon mirin
1 tablespoon soy sauce
salt - to season
a little bit of water to let the sauce down, if too thick
aka Homecooked by Aizi... juggling work, hobbies and cooking, but enjoying every minute (or that s what i tell myself)
July 25, 2011
July 24, 2011
black cherry and marrons glacés ice-cream
it had to happen.
for the whole duration of my short holiday, it kept raining on and off. not much else to do but go on a cooking spree ofcourse.
we did go to Maastricht in The Netherlands for a day-trip, and there we found a beautiful little ice-cream parlor serving the most incredible flavored ice-creams we had ever tasted.
here s Sam who couldn t wipe the smile off his face with his gelato di fragole e limone.
the next day, i just couldn t help myself. i had to make some of my own ice-cream again. a few years ago, i had received an ice-cream maker for my birthday from Sam s mom. and every summer i had made different flavored ice-creams, pretty classical ones like vanilla and chocolate and mocha, as well as green tea and black sesame flavored ones.
but this time i wanted to make something just a little bit different. i had bought a packet of marrons glacés (candied chestnuts) in Cassel, France, and i also had a few black cherries left in the fridge.
so i chopped up a few marrons. and lightly simmered a few pitted cherries. made a vanilla flavored ice-cream base. mixed and churned. and it turned out beautifully.
BLACK CHERRY AND MARRONS GLACÉS ICE-CREAM:
INGREDIENTS:
(for about 500ml)
FOR THE VANILLA BASE:
125 ml milk, preferably full-fat
tiny pinch of salt
75 gr fine white caster sugar
1 vanilla bean
3 egg-yolks
250 ml cream
TO ADD:
3 or 4 marrons glacés, chopped
10 black cherries, halved and pitted
METHOD:
1. heat the milk, the sugar, the vanilla bean (halved lengthways), the pinch of salt, until the sugar has dissolved.
2. cover and leave to infuse for about an hour.
3. beat the egg-yolks, re-heat the milk slightly and add slowly to the yolks.
4. return to the saucepan, and over a low heat, keep stirring until you get a slightly thick custard.
5. cool and add to the cream.
6. leave to cool completely, preferably overnight in the fridge.
7. meanwhile, heat the cherry halves in a little bit of water and sugar until softened. leave to cool.
8. strain the custard through a fine-mesh sieve and pour into your ice-cream maker and churn according to machine instructions.
9. halfway through churning, add the chopped marrons and the cherries.
10. churn until ready, put into a plastic container, cover and freeze completely.
11. to serve, take the ice-cream out of the freezer and let it soften slightly so it can be easily scooped.
should you not have an ice-cream maker, pour the mixture into a plastic container and freeze. every two hours, beat the mixture and also add the marrons and cherries halfway through. then mix again until completely frozen.
again, a little bit different, but nice anyway.
July 22, 2011
yellow plum frangipane tart
i had some yellow plums.
i also had ground almonds and i found a new pie tin in Dille & Kamille.
so i just had to make a frangipane tart.
YELLOW PLUM FRANGIPANE TART:
(adapted from a recipe by Angela Hartnett)
INGREDIENTS:
6 yellow plums (or any other ripe plums), stones taken out and cut in 8ths
for the pastry:
200 gr self-raising flour
100 gr unsalted butter
1 egg
tiny bit of ice-cold water
for the frangipane filling:
100 gr fine caster sugar
100 gr butter
100 gr ground almonds
1 egg
1 tablespoon lemon curd, optional
METHOD:
1. for the pastry, rub the butter very quickly into the flour so you end up with something like rough breadcrumbs
2. add the egg and bring together very quickly, if necessary add some water for more cohesion, but don t over-knead
3. wrap in clingfilm and cool in the fridge for at least 30 minutes
4. meanwhile, beat the sugar and butter for the filling until very creamy.
5. add the egg and beat well.
6. if using, add the lemon curd and mix in well.
7. add the ground almonds and, again, mix in well.
8. roll out the pastry dough to about 3mm thick and line the pastry tin (i used a long one, but a 22cm round one will work too), trim away excess.
9. line the pastry case with baking paper and fill with beans, rice, or ceramic spheres and bake blind in a 180°C oven for about 10 minutes
10. fill the cooled pastry case with the filling and arrange the plum slices on top
11. bake for about 30-40 minutes at 180°C until golden (it will fluff up a bit, and once cooled, it will be a bit denser)
seeing as the weathergods have decided to make up for a hot spring by bringing us a wet summer... this brought a little bit of sunshine in the house. so there...
July 19, 2011
Vietnamese style spring rolls
there are so many things to do and so little time.
could it be because i am now past 45 that everything seems more urgent? there used to be a time when i wasn t in such a hurry. or is it only because of this day and age we live in now? everything needs to be done more quickly, and a lot more of it in less time. the need also, to be connected with, well, everything if at all possible.
and here i am, blogging, about food, about my jewellery, twittering or tweeting (whatever it s called now), facebooking (is that a word?) etc.
and yet i m loving it. i love being able to see what the rest of the world is up to. although the news, more often than not, isn t great. it s keeping up with the little things; a friend celebrating her 23rd anniversary being married to the same man, another friend having a baby, still another becoming a grandmother. seeing my son growing up and slowly putting one step in front of the other into his own life and new experiences.
i also love having this medium to learn new things, about other cultures... naturally, about other food cultures.
and how it s important sometimes, to stand back, breathe, and slow down. taking time to prepare something you know is just going to be good. clean and pure.
i was inspired by a recipe i found in White on Rice Couple for Vietnamese spring rolls. being half Japanese and half Belgian myself, any amalgamation of flavors always intrigues me... so i had a go.
VIETNAMESE SPRING ROLLS:
INGREDIENTS:
2 chicken breasts (skinned and boned)
for the marinade:
1 thumbsize piece of ginger, grated
2 cloves of garlic, grated
2 tablespoons of soy sauce
1 tablespoon of honey
1 tablespoon of yuzu juice, or lime juice
1 small cucumber, cut into matchsticks about 5cm long
3 carrots, peeled, cut into fine matchsticks about 5cm long
5 stalks of spring onion, cut into 3cm pieces, lightly blanched
100 gr mungbean sprouts, lightly blanched
2 tomatoes, peeled, deseeded and cut into petals
some iceberg lettuce leaves, torn into manageable pieces
a handful of mixed herbs (i used coriander, mint and dill), roughly chopped
for the dipping sauce:
3 tablespoons of mayonnaise
1 tablespoon of tahini or toasted sesame paste
1 tablespoon of soy sauce
1 teaspoon of fish sauce
1 very small chilli, finely chopped
sheets of Vietnamese rice paper
METHOD:
1. begin by mixing the soy sauce, yuzu or lime juice, honey, garlic and ginger for the marinade.
2. make some diagonal cuts in both sides of the chicken breasts and marinate for about an hour or longer if you like
3. prepare all the vegetables and place them in different bowls
4. heat the oven to maximum and place a baking sheet covered in aluminium foil in the oven to also heat up
5. once everything is prepared, place the chicken breasts on the baking sheet and grill/bake for about 15-20 minutes
6. once ready, slice into strips and keep warm
7. mix all the ingredients for the dipping sauce, let it down with a little water if too thick, it needs to be a little runny
8. the rice sheets just need to soften in some water (not more than 20 seconds) and then filled with whatever one fancies from the vegetable assortment and the chicken
9. roll, dip and eat
again, in this stressful world, taking a moment to stop and savour the surrounding air, or in this case, experiencing wonderfully new flavors, has become very important to me.
and i m taking my time...
July 17, 2011
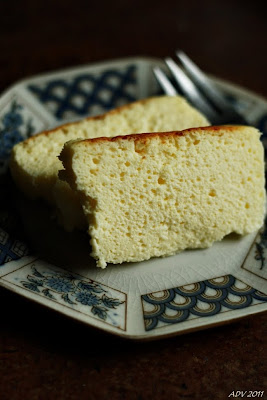
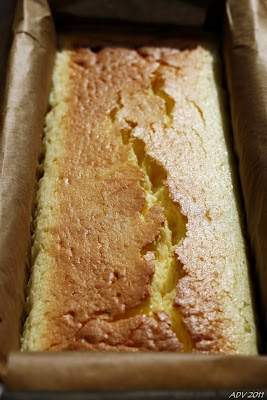
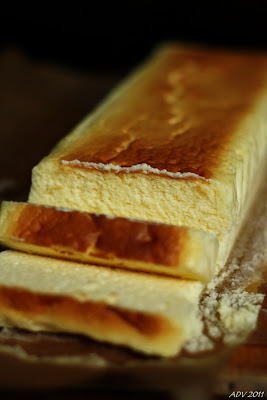
fuwafuwa Japanese cheesecake... *sigh*
are you also one of those people who are just rendered speechless when you have something so good to eat, something that evokes so many emotions, like me?
remember the scene in 'Friends' where Chandler and Rachel cannot seem to say goodbye to the cheesecake? well, i m sure that cheesecake, probably the (in)famous New York style one, is totally amazing.
i ve made a few, not many, cheesecakes in my lifetime, always to an American recipe which called for a buttery biscuit crust, loads of extra cream, and often some kind of fruity coulis on top. (which reminds me, yesterday i was flicking thru the pages of my old cookery notebook from high school, and i actually found a cheesecake recipe that supposedly was one by L.B.J... uhm, Lyndon B. Johnson to the younger ones amongst you! well, more probably it was his wife s, but anyway...)
a few months ago, around Easter, on one of my favorite blogs, i found a recipe for Japanese cheesecake. ofcourse i was immediately intrigued. would anybody have found the perfect recipe for that light, yet creamy, fluffy yet dense enough, yummy scrumptious cheesecake that i remembered of my teenage years?
so i made it yesterday.
OH... MY... GOD...
forgive me for waxing lyrical, but this was just like heaven. seriously.
JAPANESE CHEESECAKE:
adapted and tweaked (just a little bit) from GREEN CILANTRO
INGREDIENTS:
300 gr cream cheese (i did use the Phildelphia brand)
45 gr unsalted butter
3 egg yolks
20 gr white caster sugar
11 gr cornstarch
150 gr milk (yes, weigh the milk)
3 egg whites
55 gr white caster sugar
METHOD:
1. pre-heat the oven to 180°C
2. instead of using a round 18cm cake tin, i opted for a loaf tin (26cm x 10cm x 7cm) and lined that with baking paper (making sure that the paper rose a good 2cm above the sides of the tin)
3. i softened (not heated) the cream cheese in the microwave (750w at 10 minute intervals)
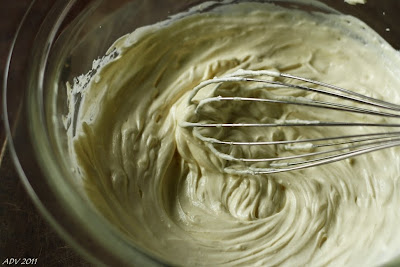
4. melt the butter au-bain-marie and mix well with the softened cream cheese
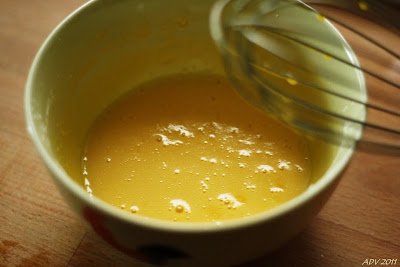
5. mix the egg yolks with the sugar and the sifted cornstarch
6. heat the milk and, just before boiling, slowly add to the egg-yolk mixture and beat this mixture also au-bain-marie until thickened (i nearly botched it up here, left the bowl with egg-yolk mixture over the hot water while i went on to prepare something else, and it nearly became a steamed omelet!... so watch it and remove from heat as soon as thickened)
7. mix the egg-yolk mixture with the cream cheese mixture (i was able to save the whole thing by running it thru a fine-mesh sieve, yay)
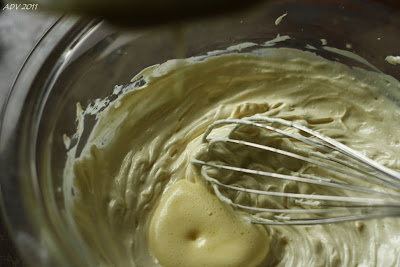
8. beat the egg-whites (which i did not lightly freeze, but only chilled in the fridge while making the other preparations) with a small amount of the 55gr of sugar until frothy, then add more of the sugar and beat until it is a creamy meringue.
9. combine this with the egg-yolk cream cheese mixture.
10. pour into the prepared tin
11. place this tin in a roasting pan and add hot water until it comes up about 1-1.5cm of the sides of the cake tin
12. bake for 15 minutes
13. lower the temperature to 160°C and continue to bake for 25 minutes or until the top is slightly golden
14. TURN OFF THE OVEN and leave the tin inside for another 40 minutes to an hour
15. take the tin out of the oven and leave to cool completely before putting it in the fridge to settle completely, preferably overnight.
i couldn t wait that long, so had to try it after a good 8 hours of chilling.
again.
WOW.
the egg yolks with the cornflour
the cream cheese with the butter
egg-yolk mixture with the cream cheese mixture
adding the meringue
ready for the oven
just cracked a little (next time must adjust oven temp)
Viv, if you re reading this, THANK YOU!!!
July 15, 2011
i am the cookie monster!
nah, not really!
but i ve always liked baking cookies. the smell that permeates the whole house while they are baking is just... so... well... it just takes you back to somewhere warm and cozy doesn t it?
Sam has a little biscuit-book:
and i use it to experiment a little.
i bought some powdered sweetened macha:
it might not be kosher, but i use this stuff for quite a lot of other things too (like icecream)
so, adapting a recipe from Sonia Allison s Biscuit Book, i made some macha chocolate chip cookies and because i couldn t seem to stop i went for choco chocolate chip as well.
MACHA CHOCOLATE CHIP COOKIES:
INGREDIENTS:
80 gr softened butter
80 gr fine caster sugar
80 gr sweetened macha powder
1 large egg
180 gr self-raising flour
100 gr chocolate chips (i used dark chocolate, but you might like white or milk or a mixture)
METHOD:
1. preheat the oven to 180°C
2. beat together the butter and the sugar until quite creamy
3. add the macha powder and mix in well
4. break in the egg, and mix
5. sieve the flour into the mixture and beat well, although it will become quite a stiff dough
7. add the chocolate chips and mix in with a spoon
8. line a baking sheet with baking parchment and spoon on little mounds of the dough making sure to leave enough space in between, because these will flatten out
9. bake for about 12-15 minutes
10. leave to cool on a rack, if you can
for the choco chocolate chip version i used 80 gr of dark muscovado sugar instead of the sweetened macha powder and added a drop of vanilla extract. i also used 165 gr of self-raising flour, instead of 180 gr, and added 15 gr of pure cocoa powder.
the rest of the method is exactly the same.
so you can play around too.
my son came by and i just had to pack a few in a box for him to take along to his girlfriend s...
now i need a cup of... something... coffee, or should i make that hot chocolate? no, perhaps ice-cold chocolate?
Subscribe to:
Comments (Atom)


